

3d Printed Cosplay: How to Get Started
In recent years, 3D printing has allowed creators to make remarkable advances in costume design and making to bring their favorite characters to life. This guide covers the basics of utilizing your 3D printer to delve into the world of cosplay.
If you are on this blog, there’s a good chance that you have considered using your 3D printer to build costume pieces and props. 3D printers have opened up a remarkable world for creators, allowing them to design, modify, and produce their own models and props for a variety of purposes. If you are new to the joint world of 3D printing and cosplay, getting started can be somewhat daunting. In this article, we go over what you should consider and plan for when preparing to embark on a 3D printed cosplay adventure.
Consider your context
Either you have a 3D printer already or are getting ready to buy one, and the sheer possibility associated with that machine can make you feel unstoppable…until you actually start trying to design something for the first time. Before diving directly into working on your project, there is quite a bit of work that must be done. Instead of sitting on your computer, a piece of paper and a pencil are going to be much more helpful in the early stages of preparing for cosplay.
Brainstorming is a crucial element in embarking on any large project, and trust us—costume design and armor or prop printing is a big project, no matter how simple your character may appear. While this article is being published during the COVID-19 pandemic, which limits the utility of some of these questions, it’s still a good idea to keep all of the following points in mind. Each consideration may not apply to every cosplay application, but reviewing these points can set you up for success when moving onto the design phase:
Event
- Will the costume be worn outdoors?
- Am I traveling with this costume? If so, how will I pack it? Am I willing to pay extra for special luggage and fees if I’m flying with it?
- Where is the venue? What kind of venue is it? Will I have to navigate stairs and elevators frequently?
- Will I be wearing the costume all day? If not, how easy/difficult will it be to change in/out of?
- Am I designing this for any contests, walks, or photo opportunities? If so, will I be moving a lot to act like my character?
- What level of comfort and mobility does the costume need to have?
- Do any real-life necessities need to be integrated into the costume? (This could include glasses, mobility aids, sensory aids for people who are hard of hearing, surgical masks/respirators, etc.)
Timing and materials
- How long do I have to design, make, revise, and repair/alter my costume before wearing/presenting it?
- How much filament can I afford to buy for this project?
- Will the costume and accessories have different functions and thus need to be printed using different materials?
- Am I prepared to store everything safely and effectively prior to the convention or event? If not, do I have space to implement an effective storage area for all my printing materials and final prints?
Design
- Will my costume need to exhibit signs of wear, bloodstains, rust, damage, scarring, etc. to look realistic for my character’s story?
- Am I printing an entire costume set or just props and accessories?
- Do I need to make or purchase any weapons or large accessories in advance?
- Do I need to integrate other materials, such as fabric or clothing, or can the entire design be made using 3D printing filament?
These may seem like a lot of details to account for before ever turning on the printer, but it’s crucial to account for as much as possible to avoid ending up with a half-finished costume or broken armor the night before you’re supposed to get to the event or hop on a virtual meet-up.
After answering all of these and taking notes on any other personal considerations that may have arisen in this prep stage, it’s time to move on to the first part of the design stage. No matter what your personal experience with drafting and design is, it’s a good idea to start with pencil and paper. Fancy design programs can facilitate rapid and easy prototype and model development, but nothing gets you familiar with your design more than trying to work it out by hand.
Even if you think you are a terrible artist or have never drawn a human figure in your life, this is still recommended. Take some time to watch a few quick tutorials on human modeling and figure drawing so you can get your proportions on paper. Then, familiarize yourself with all the elements of your character’s design. How much of their torso is covered by the chest plate? Can you still be easily recognizable if you don’t wear their signature helmet or have those giant wings? From here, you can start to conceptualize all the pieces that need to come together to comprise the entire design.
Identify the challenge
At this point, you should have a general idea of the layers of your costume, what kind of form vs. function considerations are going to impact how you make it, and how they’re all going to fit together on your body. Now it’s time for the potentially disappointing part—how much of this are you currently skilled enough to take on, and how much do you actually have time for?
Let’s return to our context lists for a moment. You identified how much time you have to complete this entire build and ensure that you can comfortably modify and repair everything before the event. If you are unfamiliar with 3D printing larger pieces or multi-part prints that need to be assembled before use, it can be difficult to estimate how much time to allocate for printing, assembly, post-processing, and potential modifications. If you’re a veteran print maker, then you know how lengthy some of these processes can be. For example, the full-size Buster Sword for a Cloud cosplay shown below prints in 15 parts for relatively easy assembly, but depending on your printer, settings, and filament, each print could take over three hours, making this one accessory to your costume a potentially 48-hour print. This timeline doesn’t account for printing mishaps, filament purchasing, painting, sanding, etc.
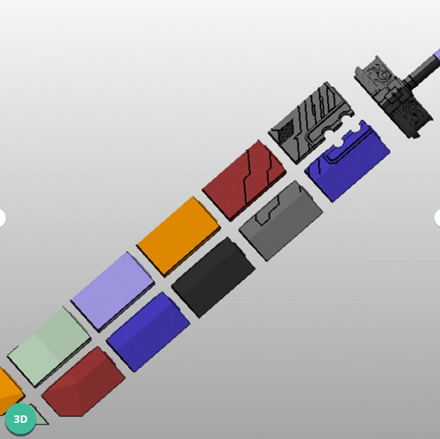
(Source: lukaverigikj on www.myminifactory.com)
If you want to dive into complex modeling, lighted parts, and articulating accessories, we definitely encourage that. There’s no better way to learn than by doing. It is important to note that this can come with a lot of trial and error, meaning time and material costs can shoot up when tackling something very complex, like a moveable wing set or an articulating helmet that can open and close over your face. Take a moment to identify the kind of time and money you’re willing to put into this project.
Review existing files and designs
It’s finally time to get your computer involved. Even if you aren’t 100% sure about all the pieces that you want to integrate or you’re certain that you want to design every part yourself, it’s a good idea to look at existing cosplays of your or similar characters that utilize 3D printed parts. Your 3D printing software should give you estimated filament requirements and print times. Following up on our last point, this is when you can start getting a very concrete notion of what you can and cannot complete within your timeframe. Although we’ve reiterated it several times, don’t forget the extra steps. Almost every costume will require sanding, sewing, painting, gluing, etc. Looking at other makers’ build notes and experiences with these costumes can help you estimate your time and material costs per piece.
Generally, for full armor pieces or complicated mixed fabric/3D printed designs, we recommend starting printing and design at least three months from your event. This will give you enough printing and processing time without requiring that you buy all your materials at once.
Model yourself first
In the last step, you may have found some files you want to print or modify for your design. However, before settling on specific models, we strongly recommend scanning yourself first. There are a few inexpensive ways to do this for the average home hobbyist, and the results may not be perfect. Even an imperfect 3D model of yourself (or your body parts on which armor or accessories will be worn) can be a huge help in getting dimensions right the first time.
Printing costume parts
When tackling a large and complex project like a full cosplay, we recommend starting with the most difficult parts first. Your most detailed prints or the largest one that requires the most assembly should be printed before everything else so you can handle any technical mishaps or design failure early on. This can also be a great time to ensure that your chosen filament is up to the task. Typically, TPU (thermoplastic polyurethane) is recommend for larger cosplay prints owing to its slight flexibility with high wear-resistance, making it less likely to snap or fracture under the stress of bodily motion.
We won’t get into all the minutia of printing specific costume pieces here, but keep the following in mind when working on complicated pieces:
- Check your orientation
- Poorly oriented pieces require far more post-processing and filament than well-oriented prints. Spending an extra 10 minutes fine tuning model settings can save you hours on a damaged or poorly designed print.
- Stay as light and thin as possible
- For shorter build times and ease of use, try to stay on the lighter infill and thickness side. Obviously, parts that are subject to more stress should be stronger, but unless you’re planning on LARPing in your costume, you probably don’t need something that can hold up to a fake sword or a few punches.
- Prototype
- For very complicated or highly detailed pieces, print a few scaled down iterations to test your settings before dedicating the 24 or so hours the final print might need. Like a normal test print, this can help identify any filament, printer, or design issues before the final piece is underway.
Post-processing
While we’re huge fans of what 3D printing can do, nothing really makes a design come to life like the final stages of sanding, painting, or sealing a costume print. Be prepared with varying sandpaper grits, glues, masking tape, paints, and any epoxies or sealant sprays depending on the level of detail your specific character design calls for.
It’s recommended, particularly for those who aren’t very crafty or artsy, to spend some time practicing on off-prints or test prints. Does your character have a well-known and easily identifiable rusty and damaged weapon from their time wandering a post-apocalyptic wasteland? Are they a well-manicured royal character known for having gilded accessories and jewels adorning their armor? Before potentially messing up your final prints, practice the colors and finishes on other materials to ensure that you can comfortably get these details down on the final costume.
Have fun with it!
This guide may be a bit too detailed or serious for the hobbyist cosplayer that was only looking for an answer to, “What filament should I print this hilt with?” Despite the details covered here, this guide is suited for veteran and beginner 3D printing cosplayers alike. Even if not every bit of nuance and planning applies to your design, covering the bases discussed here can save you endless time and frustration in the future.
Remember, even the most serious and well-respected costume designers and cosplayers are doing it for fun. It’s okay if your costume did not end up being perfect or if a few of the colors aren’t just right. It’s more important that you were able to enjoy a day (or a few days) of an event with like-minded people who enjoy this hobby as much as you do. There’s always more time to try to perfect your costume or add the more complicated pieces.
Leave a comment