

Best 3d Print settings for Iron Man helmets
Whether you just got started with 3d printing or have been printing for a while, chances are you’ve wanted to print, or have printed an Iron Man helmet. I mean come on, it’s one of the coolest 3d prints you can make. Not only is it an amazing display, but you can wear it too! You can even add lights, motors to make it move, and sounds to make it realistic. Makes you feel like the REAL Tony Stark.
Because of the type of print, some people might be averse to trying to 3d print one. But printing an Iron Man helmet is the same as 3d printing a benchy or any other 3d print. There’s really nothing to be intimidated about.
So let’s get into it and 3d print the perfect Iron Man helmet.
Get the File
First we need the Iron Man helmet file. There are a LOT of places to get one, but the free Iron Man MK50 helmet from Nikko Industries is one of the best out there. It’s split into the faceplate and the main helmet. It’s movie accurate and prints VERY nicely.
What printer to use
The 3d printer I recommend for printing Iron Man helmets is a CR10. The reason for this is it has the minimum print volume needed to make these helmets. You can still make them on a smaller printer, such as a Prusa i3 or Anycubic, but you’ll need to assemble them and remove the seams with filler. Printing an Iron Man helmet in once pieces is just much more effective and far less time consuming. It also comes out a heck of a lot better. You can get a CR10 here:
The nozzle I use is a .6mm brass nozzle. I’ve found that it’s the optimal size for 3d printing props and Iron Man helmets. It combines speed with detail. You can print the Iron Man helmets with 2 walls rather than 3. It significantly cuts down print time while still maintaining detail on your prints. You can get the nozzles here: Click here

Drop the File Into Your Slicer
After dropping the file into your slicer, you can now start with the meat of how to 3d print your Iron Man helmet perfectly. It doesn’t matter which slicer you use, they all translate about the same. But let’s start with orientation. There’s really no wrong way to do this, but there is an optimal way. And the way you want to do this is by having the least amount of supports possible while still producing a good print.
The slicer I use is Simplify 3d. I like it because it allows me to add custom supports to where I feel it should have it, and remove the supports where I don’t think it’s necessary. It saves me on filament, time, and most of all headaches. I cant begin to tell you how many prints would’ve failed had I not been able to add custom supports to the print.
You want the base of the helmet to be as flat as possible. Meaning it has to be as parallel to the bed as much as it can. So rotate the helmet until the base of the helmet is as parallel to the bed as possible. This will minimize the amount of supports needed for the print. Then add supports around the base of the helmet around the perimeter. You don't need supports in the center. This will make the print faster and use FAR less material.
Next, lets take care of the overhangs. The forehead part will most likely need supports. For this, we need to make sure that this part has a TON of supports and wont wiggle, while it’s printing. That’s how you’ll get shifting layers around the forehead part. So make sure that the support here is thicker and more solid.

There are other schools of thought for printing the helmet. I’ve seen them be printed upside down, or printed with the back of the head to the base. Its all a matter of preference really. When printing upside down or with the back of the head to the base, you’ll have a heck of a time sanding it down after it prints, because the supports will damage the surface. It wont destroy the surface, but you’ll definitely need to sand it.
Now for the face plate. You can do this one of two ways: either have it directly vertical, or at a slight angle. Either one is ok, but the angled option uses more supports. Neither is wrong, its entirely up to you which one you prefer.

Slicer Settings
Before we get into this, we need to select the material we’re going to use PLA. It’s the most common printing material and the best value. One thing to note about PLA is that it warps in the heat. So make sure you’re taking that into account when you have this. You can very well print in PETG, and there are other settings for that, but for this purpose we’re doing PLA. So needless to say, these profile settings are for PLA.

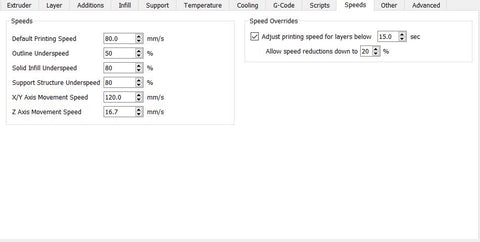
If we’re going to print at higher speeds we have to make sure that the nozzle is hot enough to push the filament through. If it’s not hot enough the extruder motor will start clicking and you won’t be pushing enough filament through, leading to under extrusion. I’ve found that 80mm/s is the optimal speed for my machines. If you need to calibrate your machine, we’ve written an article about it to help you out.

Now bed temp is unnecessary. You can print without a heated bed. I’ve had my bed heater break before, and I laid down some masking tape and it prints fine. Just make sure you level your bed again after laying down the tape as it’ll slightly raise the bed to the thickness of the tape. This can drastically affect your print and first layer.

If for some reason, your machine still isn’t printing the Iron Man helmet, or any print really, perfectly then you might want to look at troubleshooting what’s wrong with your machine. We’ve built a super in-depth guide for troubleshooting. You can find Part 1 HERE
Final Thoughts
3d printing your Iron Man helmet isn’t hard at all. You can easily print one with just normal settings for your machine. But to 3d print the Iron Man helmet with the best settings for speed and quality, these are the settings you need to use. If you have any questions feel free to ask via email or Facebook!
Leave a comment