
Best Simplify 3d Profile Settings for Your 3d Printer
Getting the perfect print on your machine is hard. It takes weeks, and even MONTHS to get the perfect profile settings for your 3d printer. But fear not! I’ve done the work for you. These are the exact settings I use for my machines. Now granted these are for my CR10S4 and for the filament I mainly use. But this can be a good foundation for your own machines. A little bit of fine tweaking and you’ll have your own settings for your own machines. Each machine, I believe, has it’s own personality. But these profile settings should give you a good starting point as to how to proceed.
Another thing to note, these settings can also be translated to Cura.
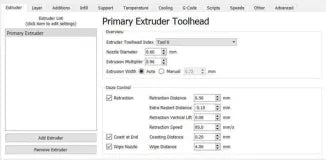
Extruder
In this setting I use a .6mm nozzle. I buy a pack of them from Zyltech. I also buy all my filament from Zyltech. I’ve set the retraction distance, coasting, and extrusion width to what you see here. These values I’ve seen are what work best for my machines. I personally use a CR10S4. It’s a beast of a machine and gets everything I need done.

Layer
I normally print with .2mm layer height. It gives me the greatest detail possible. I also don’t have to sand as much with this setting. It makes it easier to smooth out. There are many ways to smooth out your 3d prints. See the blog for details.
Also, you'll notice that I'm only using 2 perimeters or walls. This is because since I'm using a .6mm nozzle, I can us less walls for my prints, which DRASTICALLY, shortens my print time.

Speeds
Speeds differ for different materials. TPU for example prints at a much slower speed and much hotter temperature. But for this example we’ll be using PLA. I print mostly at 80mm/s. I still get great quality prints. You just have to make sure that your nozzle is hot enough to push plastic through at these speeds.

Temperature and Cooling
For temperature I print at 220 because I want to print fast. Printing fast means I need to push plastic out quickly. If the plastic is cold, then it wont come out fast enough and well I don’t need to further explain that. You can however print at 210 with a 60mm/s speed.

For cooling, here are my fan speed settings.

Final Thoughts
And that's it! There's really nothing to it. Again, these can easily be translated to other slicer settings, and in theory, should produce the same results. Not all slicers are built the same, so you'll still need to do some tweaking.
Hope you found our guide useful!
Leave a comment