
How to 3d Print a Steak
It would not be an overstatement to say that over the past few years, the world has had a lot of advances in technology and even though 3D printing has been with us for quite a while, only quite recently have they been adopted seriously to make plant-based meat.
About 10 years ago, mentioning something like vegan meat or plant-based meat would have sounded almost impossible but as of today, it is not only possible but it is happening.
Just like any other normal printer, 3D printers for meat simply follow digital instructions, this means that startups get to chose what design of steak they want, how much of every ingredient and fat they want, and how they'd like it to be distributed.
Keeping these in mind, this article has been put together to look into the concept of 3D printing steak. We would take a look at the process as well as the key steps to print the perfect 3D steak. Without further ado, let's get started!
The Technology Used In 3D Printing Steak
As we have witnessed great advancement in printing technology, new developments have come up in 3D bioprinting technologies as well. Specifically, when talking about 3D printing steak, thanks to a technology known as Proprietary Tissue Engineering Process, this concept has come to life.
This technology works by first isolating bovine stem cells from a tissue sample and multiplying them until they reach a sufficient cellular mass. Once at this mass, stem cells are formulated into a bio-ink which would then be used in the 3D bioprinter.
Using a digital model of a steak structure, you can then fabricate a steak and place it in an incubator to mature. During this maturation period is where the cells finally differentiate into fat and muscle cells.
As bioprinting technologies and cultivation continues to advance, very soon, it would be impossible to differentiate between a steak that is virtually produced and a farm-based steak.
How to 3D Print a Steak

Although the availability of a 3D bioprinter, no doubt, is the primary requirement to create a 3D steak. However, it doesn't end there, there are a lot of other things to bear in mind.
Three general areas impact precise and accurate steak printing, viz; materials/ingredients, process parameters (nozzle diameter, printing speed, printing distance), and post-processing methods (baking, microwaving, frying).
Most advanced 3D bioprinters have preloaded recipes onboard and also allow you to remotely design your steak. We have listed below all the required steps to follow so that you can 3D print your steak without any hassle.
- Materials and Ingredients
A number of start-ups make use of plant-based ingredients such as pea protein, beetroot, chickpeas, and coconut oil which are high in protein and contain no cholesterol, which is then produced by 3D bioprinting technologies to replicate the molecular makeup of standard meat. However, over the years, it was discovered that adding cocoa butter to the mix promoted the formability of the 3D printing gel.
One disadvantage to this new technology is that persons who are allergic to wheat, gluten, or soy, or who have celiac disease, will be unable to consume the new substitutes. To solve this problem, the researchers tried substituting pea protein for soy protein, but the resulting dough was too soft to print.
The printing "ink" is also made up of plant-based ingredients. It contains proteins from legumes and grains to create the muscle texture of the substitute meat; it also contains fats from the plants, to mimic the beef fat, and natural flavors and colors, to mimic the blood factor in meat and its juiciness.
- Printing temperature
The temperature you set for printing your meat has a very important direct effect on the outcome of your 3D printing. The safest method for processing meat products is to make use of low temperature-3D printers. The use of heat and cold set binders helps to enhance the rheology of the meat paste. A temperature-controlled extruder-type 3D printer built with a multi-head system is suggested to suit the conditions for meat safety and rheological requirements.
A multi-material 3D model that fulfills specific individual needs, such as chewing and swallowing challenges, can be constructed using nutritionally balanced ingredients and novel interior structures with very good success.
- Extruder nozzle
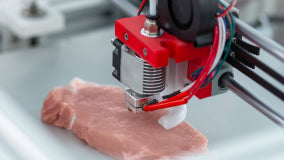
The Platform on which the steak is printed consists of a standard 3-axis stage with a computer-controlled extrusion head. By using compressed air or squeezing, this extrusion head forces food items out via the nozzle.
The nozzle varies with respect to the type of food being extruded or the required printing speed, (typically the smaller the nozzle the longer the food printing will take). The extrusion head moves along the 3-axis stage printing the desired steak.
Food materials are extruded gradually via the nozzle as the 3D food printer scans the design profile, layer by layer, to generate the required shape. The use of numerous nozzles allows a wide range of meat materials to be printed on the same object without flavor mingling. The technology can also transfer nutrients to the meat material, allowing the freshness and sweetness of the food to be tasted right away.
- Safety
When 3D printing food, safety is very crucial. A food printer must ensure that the food material is safe during its entire journey. Bacteria growth is a serious worry due to the risk of food becoming caught anywhere along the way. Microbial stability is a critical aspect of printed food quality, thus it must be considered both during printer design and during the printing process.
The materials that come in contact with the food, on the other hand, may not be as much of a concern because high-quality printers employ stainless steel and (Bisphenol A) BPA-free materials.
- Post-processing
In the post-processing phase, the printed steak may require additional steps before it can be consumed. This includes processing activities such as baking, frying, or cooking. This phase is one of the most critical to 3D printed food because printed food needs to be safe for consumption. Another concern that can be noted in the post-processing phase is the deformation of the printed food due to strain from these additional processes.
Additives such as transglutaminase and hydrocolloids have been combined with ingredients to help the steak retain the printed shape while printing and after cooking. Modifying specific parameters in the simulation, the true effect of baking on food can be illustrated. With further research and development, a visual simulation of 3D printed foods being cooked could predict what makes them vulnerable to deformation.
The post-processing phase also includes adding flavor, vitamins, and iron to the final product.
Conclusion
Livestock farming is one of the major contributors to deforestation, land degradation, desertification, and water pollution. These, among other reasons, have led to the new promising technology of meat bioprinting.
The physical features of the materials limit the range of food that can be made with 3D printing, as opposed to traditionally cooked meals. Food materials are typically softer than the weakest plastic used in 3D printing, making the produced structures extremely fragile.
Despite the advancement in 3D printing technologies, many people are still unaware of the fundamental concepts of 3D bioprinting. These include the proper technique to make the perfect 3D steak. If you share any of these concerns, perhaps this article would provide you with enough information to ease your worries.
Leave a comment