

How To Build An Easy Enclosure For Your 3D Printer
3D printers are one of the most promising recent inventions due to their numerous advantages. One of the best things about 3D printing is the additive technology, which offers a whole new way to make products compared to traditional manufacturing methods.
Sometimes, though, you may experience some issues, such as warping and shrinking objects. Or the dust that builds up in your printer's moving parts and rods.
So what's the best way to save the objects from getting warped, or how to keep my printer parts from getting dusty? That's where a 3D printer enclosure comes in handy.
Enclosures for 3D Printers
An enclosure is a sort of protective shell around a printer to preserve temperature. Simply put, it’s like a box that protects the print temperature by keeping the heat inside and preventing external factors from impacting it.
An enclosure also helps isolate noises from printers and keeps gases that cause odors at bay. Once the print is complete, you just open the window to let the gases out.
- Is it Necessary to Have an Enclosure?
Normally, you don't need an enclosure if you're using PLA, PETG, etc. Unless you're printing with ABS or with some industrial material, you're going to need an enclosure.
It's important to keep the surrounding temperature constant when printing with ABS, so an enclosure is a necessity. Otherwise, the ABS prints will warp.
The process of building an enclosure by yourself doesn't take much time, and you can easily do it at home with supplies from the local market.
Let's see how you can build one yourself.
Building an Easy 3D Printer Enclosure
Ikea Lack (the Enclosure of choice for 3D printing)
In the 3D printing community, Ikea Lack enclosures are the most popular. Look online, and you'll find dozens of Ikea Lack enclosures. For under $10, you can get this table that's almost perfect for your 3D printer.
The tables can be stacked for the purpose of creating bays for multiple printers, or they can serve as storage for filament and tools.
- Materials Required
The enclosure will require two or three Ikea LACK tables as well as four Neodymium magnets 20mm x 6mm x 2mm, three Plexi 440 x 440 mm with a 3mm thickness, and two Plexi 220 x 440 mm with a 3mm thickness.
- Electronic Components
A Fire/Smoke Detector and an Indoor/Outdoor Thermometer, a LED stripe 24V 30 cm long (voltage may vary according to the printer model), a Twin cable 100 cm in length, and two WAGO 221 or similar compact lever connectors.
- Printed Components
To assemble the system, you will need an upper enclosure box, a lower support table, and spool holders.
- Screws
Additionally, you will need 12x 6*20 mm (12 x 3/4′′) and 4x 6*50 mm (12 x 2′′) screws.
- Tools Required
You'll need a Philips screwdriver, Allen keys, some super glue, a drill + 3 mm wood drill + 10 mm wood drill, and a measuring tape.
The Set-up
A. Upper Enclosure Box Installation
The first step is to build the top enclosure box by attaching the printed corner pieces and the table legs.
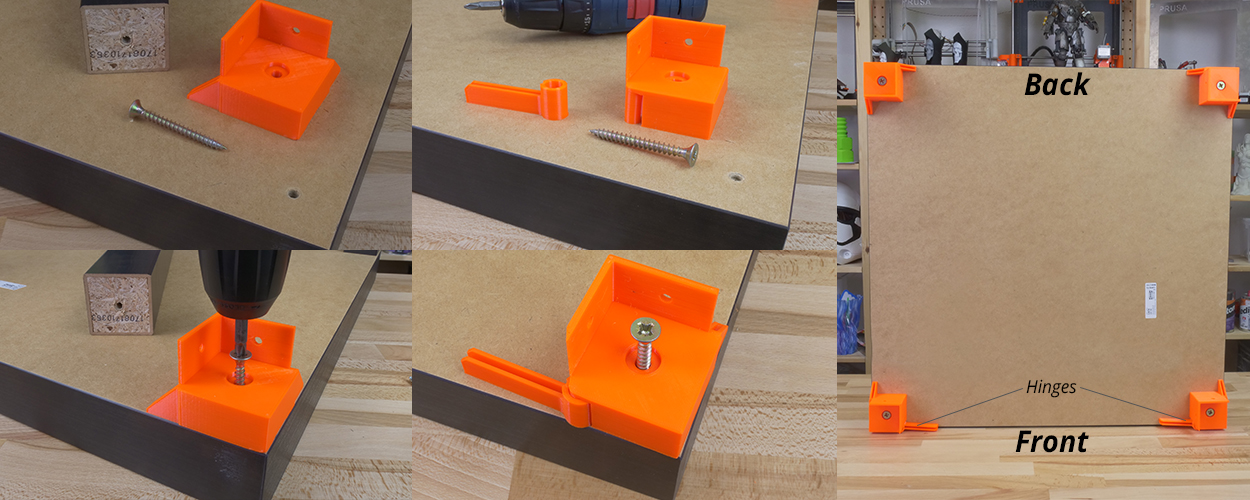
1. Putting the legs together

Around $12 gets you LED strips with power supplies. Alternately, if you're handy with wiring, you can power the LEDs directly via the printer's power supply. But be careful when choosing the LEDs, though voltage varies from printer to printer.
2. Spool Holders
They are easy to install. All you have to do is screw them on the top, and they are ready to use.

3. Smoke Detector
The smoke detector should be installed on the back of the table so as not to obstruct the insertion of the filament or get in the way of the printer when you are removing it from the box.

4. Bottom corner standoffs installation
Don't forget to put the Plexiglass in first before screwing the bottom standoffs. The Plexiglass won't come off once the standoffs are tightened. It is, therefore, easier to lift this portion of the enclosure without worrying that the glass will fall.
It's worth noting that one of the four standoffs has a slot for cables. If you place this standoff on the left side, the cables can be routed directly to the EINSY board.

B. Installing the Lower Support Table
Higher temperatures in an enclosure are not conducive to electronics. It's better to store the power supply outside the box so it can remain in good condition. In fact, it's safer that way!
- You need to unplug the printer. Take the zip ties off the frame to release the PSU cables. Make sure the cables are tight. (Tie new zip ties to the rest of the cables.)
- Ensure the cables are disconnected from the EINSY board. Remember to disconnect the Power panic sensor too.
- Take the PSU out of the frame.
- Place the PSU next to the left rear leg (the one with the cable pass-through). Attach the PSU catcher printed part to the PSU holder printed part by using two screws.
- Now that the PSU is fixed, you can slide it out whenever you need it.
- The PSU on the frame can be replaced with the printed part to give the frame better rigidity.

1. Frame brace and right-angle cable cover
When you take the power supply out of the frame, you can replace it with another part and change the frame stiffness. You have a chance of hitting the Plexiglass in the rear of the enclosure with the heatbed cables. To avoid this, you can create a 60 degree heatbed cable cover.

2. Magnetic Handles and Plugs
Put the four plugs at the bottom back in place. There's one that's got a pass-through for the cable. Put that on the left-hand back corner. Attach the door stopper to the table with two magnets and screw it into place. Ensure that the Plexiglass and handles have enough room (1 cm).

3. That's it. You have a Working Enclosure
All that is left to do now is to stack the two tables on top of each other, and the enclosure will be ready. You can lower the printer to make it more comfortable or add another Ikea Lack table to the bottom for extra support.

Conclusion
An enclosure for a 3D printer is not very complex. If you only need to use it occasionally to print ABS, then this enclosure is fine. You can add more features and flexibility as needed if you want.
You need a solid sheet to give your printer enclosure more stability so that you can add more features.
Adding a display and additional unique options to the enclosure's body gives the user easy access to control the printer while it is housed in the enclosure.
Create a fireproof enclosure with metal sheets if you want more safety. The cost of creating an enclosure out of metal sheets is high, but it also offers more safety features.
Leave a comment