
How to Convert Your 3d Printer into a CNC Machine
If you think the 3D printer is incredible, the possibility of converting it to a laser engraver takes the awesomeness to a whole new level. Yes! You can 3D print and laser engrave with the same machine. Amazing right? We will see just how it’s done. The 3D printer can go from becoming a manufacturer’s most important tool to a source of creativity and fun. But there is more.
The possibility of creating a laser engraver out of your printer has added another dimension and opened a whole new vista of possibilities. Even more refreshing is that you do not have to break the bank to make these printers engraver conversions happen.
With as low as $70 for a laser (depending on the capability), you can make your 3D printer even more valuable and exciting. This means more value for the purchase amount and more fun. It’s time to get right into it.
How Does Laser Engraving Work?

The laser engraver works by heating a material to a temperature that will remove its layers. These layers of solid material turn into vapor without passing through a liquid phase and escape, leaving behind the exposed cavity that forms the image. Laser engraving works like a chisel, carefully and systematically, carving out and producing patterns.
The patterns have been predefined and fed to the machine which then gets to work to reproduce it. There are many materials that a laser engraver can penetrate depending on the power output of the laser. These include plywood, paper, glass, rubber, cardboard, leather, clothing, thick wood, stainless steel.
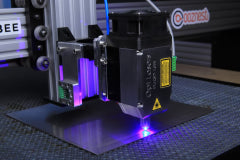
Converting a 3D Printer Into a Laser Engraver
Here are the basic steps you will follow in modifying your 3D printer to a laser engraver.
Step 1: Detach the Fan and Extruder
The first step to convert your printer to a laser engraver is to detach the fan. You should start by ensuring that the printer has been powered off. Using a wrench, unscrew the extruder from its cover. When you have successfully separated the cover, lose the buckle that holds the extruder cable, and afterward, remove the screws that connect the extruder board cover with the extruder.
Next, open the board cover to expose the interior, where two additional screws hold the extruder to the connection board. Again, loosen and remove these screws and carefully pull out the connection board. Now, you can detach the fan connection cables from their place (you may need tweezers to aid the removal of tightly connected wires).
At this stage, two screws visibly connect the fan to the extruder. Once loosened, the fan and the extruder should quickly come apart.
Step 2: Attach the Laser to the Printer
Lasers come with their specific operating voltages, and as a result, you will need to adjust the voltage of your 3D printer to that of your laser. For example, some 3D printers like the Ender 3 or 5 operate with a maximum of 24 volts while others like the CR-10 operate with 12V which you might need to step up or down to match that of your laser.
However, there are instances where your laser can work perfectly well with the 12 volts of the printer. If your printer requires a step-down, which is required for most lasers, this is the time to connect your voltage step-down regulator.
The step-down regulator has input, power, and output pins which you should attach to your fan connection cables by soldering. Now connect the laser fan to the port of the cooling fan, the laser to the laser port, and the wires from the printer’s motherboard to the power port.
Step 3: Laser Installation
Your laser should come with custom brackets with which you can mount them. If not, you have the option to find improvised mounts or fabricate one using your printer. You can find ideas for bracket designs compatible with your laser and printer on websites such as Thingiverse.
Once your laser bracket is ready, simply screw it to the bar by removing the main holder, mark two points on the mounting bracket, and with a drill, produce two holes where the screws for the laser will go into. These screws will attach the laser to the printer.
Step 4: Laser Setup
For the in-built Gcode control, the M106 S ranges from 0 to 255. M106 S0 sets the fan to 0%, which will put it off, the M106 S125 will select the fan to a little below 50%, and the M106 S255 will select the fan completely or 100%. The laser operates on a Pulse Width Modulation to regulate its power. To enjoy a smooth ride, do not set your minimum power to zero, as this could cause delays in getting your laser to resume its job after momentary lull inactivity.
For a 12V laser, a 10% duty cycle means that the laser will be 90% less active or intense even though it remains powered on for the whole duration of the engraving process and will produce a power of 1.2V. The 10% value is an excellent minimum power for wood as it doesn’t suspend the ability and yet doesn’t cut the wooden material.
A 50% duty cycle will produce 6V, while a 100% duty cycle will produce the maximum 12V of power supply. Remember to set all the axes to auto home before placing the fan to any value other than M106 S0 but low enough for a test. Insert a piece of paper on the printer bed. The laser has a knob that you can turn to adjust the focus while you shift the paper to avoid getting it cut through by the concentrated laser beam.
Step 5: Laser Software
You can use several engraving software for your design, such as TurboCAD, Adobe Illustrator, and Inkscape, which you will use in conjunction with two plugins. Extract the plugins and copy their contents to the written location. Next, open the laser software and set your printer’s workspace to the desired dimension on the software. Make sure to place the workspace at the bottom left corner.
Now, you can choose and import whatever engraving you desire to the workspace on your software and vectorize the design. Set your speed and select the appropriate output folder. Afterward, the G Code will generate automatically in the text file, and you can open it up and replace the “txt” on the file name with “.gcode.”
How to Choose Your Materials
Converting your 3D printer to a laser engraver is not as difficult as it may seem, but only if it is a diode laser. It is pretty complicated to convert printers to Carbon (IV) Oxide lasers. If you have your laser and all other materials ready, you should have your laser engraver prepared in no time.
There are several vital materials you need to perform this conversion. To avoid running into trouble and wasting your money, choosing the right kind of material to use is essential. First, let’s talk about the leading player in the process, the lasers, and how to choose the right one.
The Laser
There are several types of lasers for different kinds of surfaces. For example, a powerful enough laser to engrave plastic may not be powerful enough to cut through the acrylic. Finding the most suitable laser depends on various factors, including the material to be worked on, the level of accuracy, and your budget. The material to be worked on will determine the power output you should look for when choosing your laser.
There are lasers of 500mw which can do the minimum engraving of simple shapes into plastic and leather 1W, 2.5W, 5.5W, 10W, and so on. The higher the power output of the laser, the quicker and more profound it will engrave, and the more expensive the laser will be.
The diode laser has less than 10W and is a less complicated alternative to the carbon (IV) oxide laser. If you intend to use a laser at home to have fun and explore your creativity with weaker materials, you won’t need more than a 2.5W laser. Your laser should come with protective goggles which you should put on while operating the laser engraver.
A Step Down Regulator
A step-down regulator is a common feature when converting your 3D printer to a laser engraver. This is because your output voltage is required to be in tandem with that of your laser. Your laser comes with its requirements and will not accept just any voltage from the printer. The step-down regulator can reduce the output voltage of the printer.
Conclusion
Your 3D printer can double as an engraver with only a laser diode as additional material. Converting your printer to a laser engraver involves choosing the suitable laser module and replacing the fan and extruders with them. Then, all you need to do is loosen the extruder and fan, attach your laser, calibrate your laser, and program the software. Your laser engraver will be ready to use and give you designs you have always dreamed of.
Leave a comment