
How to Finish PLA Prints
All FDM 3D prints will show layer lines, regardless of quality or fine-tuning. This guide covers everything you need to know about finishing and polishing your PLA prints.
Unless you are working with purely functional models, every print produced using an FDM printer requires some level of post-processing. In this article, we cover the best strategies for polishing and finishing PLA prints, considering the filament’s properties and common finish issues.
Start with sanding (always)
PLA prints always benefit from a few rounds of sanding. The extent to which you will work to finish your print is based on your end goal—Is the print a tool or a decoration? Will it see heavy wear or sit on a shelf? If you anticipate painting and sealing your print, moving up to the finest sandpaper grit (4000) is highly recommended. Typically, makers should start with a medium-fine grit around 200 to gently buff away layer lines and support nubs. After each round of sanding, move up one or two grit levels. To maintain the integrity of the print and reduce the risk of scratching, gently sand each surface in small, circular motions.
When sanding PLA prints, it is critical that all sanding is done by hand. Power sanders are great for woodworking, but the multidirectional force exerted on the print can severely damage it, and it is much harder to control the level of sanding when using a power tool. Instead, consider buying or printing a few craft sanding blocks to get into the nooks and crannies as well as some larger blocks or foam sanding pads for larger, flat surfaces.
Sand your prints in a well-lit, well-ventilated room. Hold up the print to your light source to check for uneven sanding and scratching between each grit level. We strongly encourage the use of appropriate PPE whenever possible. Particulate filtering masks are commonly found in home improvement stores—these are great for minimizing exposure to the sanded filament particles.
Polish your print
Polishing compounds
Sanding is great for smoothing PLA prints, but the final product will still show some small lines. One excellent method for covering them up is applying a polishing compound, which will fill in any remaining layer lines and provide a solid base for bringing the print surface to a shine. Polishing compounds are often found as bars with different grades. To use a polishing compound to coat a PLA print, apply some compound onto a buffer wheel on a rotary tool, set the tool to a slow speed to avoid overheating and wear, and gently polish the entire print. Some compounds can be applied by hand, which may be preferred for smaller or more detailed prints. Be sure to carefully read all instructions and use information prior to purchase to ensure that the compound meets your specific needs.
Sandable spray paint
Another polishing method is applying sandable, high-fill primer spray paint, which is found in most hardware stores. These paints can be applied thinly and evenly, allowing for quick drying and multiple rounds of coating. Each layer will fill in the depressions and lines in the print, and the final layers can be sanded and polished with a very fine grit for an excellent shine.
Resin coatings
XTC3D from Smooth-On is just one example of a two-part brush-on resin that can yield a tough, shiny exterior for any print. These types of resins are a bit thicker than spray paints, allowing brush strokes to disappear during the curing process. Also, resin shells are smooth enough to allow for easy painting for models and figurines.
💡 Be very careful when selecting finishing resins for PLA prints. Some resins heat up significantly when curing, which can warp or damage PLA models. It’s always a good idea to do a quick search on your chosen resin to see if it’s been used by other 3D print hobbyists.
Heat it up
A much less widely used option for PLA smoothing is carefully moving a heat gun along the print surface. This technique requires a lot of practice because too much heat + thermoplastic material = a melted print. If you’re confident enough to try this method out, we recommend sanding the model first to expose the PLA, which allows for more even melting and sealing. The heat gun should be moved evenly over the print without lingering in one place too long as this will melt or deform that portion of the print.
Whenever working with heat and thermoplastics, it is imperative to work in a well-ventilated area. Although most PLA manufacturers market their materials as safe for in-home use, you should prioritize your safety over convenience.
Leave it to the pros

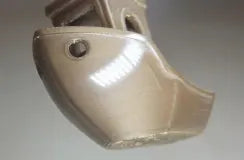
(Source: Polymaker)
While most makers turn to acetone for a quick and easy polishing technique when finishing ABS prints, this method does not work for PLA prints owing to differences in each material’s chemical composition. Other chemicals can serve the same function, but few are recommended for in-home use and even fewer are safe for hobbyists who are not very familiar with chemical safety standards.
Enter Polymaker—the well-known filament manufacturer released the Polysher to fill this gap in chemically-supported polishing. A 3D print can be placed into a sealed chamber and sprayed with atomized isopropyl alcohol. This mist reacts with the plastic in a manner similar to the acetone–ABS reaction, slightly melting the outer layer and smoothing it.
After the outer layer softens, the surface will be tacky for a short time. It is recommended that the print is left to “dry” for at least half an hour before further post-processing. This method is great for producing very smooth prints, but sanding is still recommended to yield the best polish.
Final considerations
PLA smoothing is easy but requires a bit of time and energy on the maker’s part. The final products are well-worth these investments. Consider the methods listed above when designing your next PLA model. To avoid losing too much material in post-processing or having to maneuver around awkward curves or risk dulling sharp edges, you may wish to split up the piece into easier to finish parts which can be assembled later.
Regardless of the approach you use, you will likely find the methods that work best with your preferred PLA brands and the types of models you tend to print.
Leave a comment