
How to Update Prusa Firmware
Updating software and applications is not exactly new to us; it’s something we do regularly on our smartphones for better operation. Usually, Google Play store for Android and Apple store for iOS is how we carry out updates.
A Prusa 3D printer has neither of these online stores. So how then do we update the Prusa firmware? By the time you're done reading this article, you should be able to update Prusa firmware with ease.
Prusa Research updates numerous things, including firmware on a regular basis. The latter includes enhancements to the printer's operation, such as new features and correcting problems from users’ feedback.
Prusa's firmware is a modified version of Marlin, which is a popular open-source build. It was produced alongside Adrian Bowyer's RepRap printer family. With that said, let's move on to how you can update the Prusa firmware.
Updating Prusa Firmware
Making sure your Prusa firmware is the most recent version will help for the optimal operation of your printer. Here's what you'll need:
- A computer running Windows, macOS, or Linux.
- A USB cable. The original cable included with your printer is most preferred.
- Lastly, you'll need PrusaSlicer and the printer's driver installed.
If you don't have PrusaSlicer and the printer's driver installed, you can find it on Prusa driver's website.
Before you start,
- Check for your printer's current firmware version (To check the currently installed firmware version on your Prusa 3D printer, you just have to power it up, scroll down to the LCD menu, locate and open 'Support'. Navigate to the bottom of the support page and there you will see the firmware version.)
- Prusa Research makes new versions as modifications from previous ones based on user feedback. So before updating, you can compare the version installed now to the other version available on Prusa's drivers’ website. It has a release log that enables you to see the merits of a new version and if it solves a problem you might be having.
- If you decide to make the upgrade, then you can proceed to download the right package still from the Prusa drivers website. The next step is to flash the firmware onto your printer.
Note that flashing and updating will be used interchangeably in this article as they both involve installing another version of the software made available by the producer.
In six quick steps, you can flash the Prusa firmware onto your printer.
- Ensure your printer is on, then connect the RAMBo board to your PC using the USB cable included with the printer(the square-shaped USB-B 2.0 cable).
- The next step is to unzip the .zip file to a folder on your system(computer).
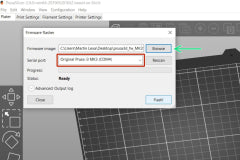
- Then open the already installed PrusaSlicer. When you do that, then click on the 'configuration' menu and select 'Flash printer firmware'.
- The next step is to click on the 'Browse' button and select the .hex file you had earlier unzipped in step 2 above. The firmware MK3S file's name is prusa3d_fw_MK3S_x_x_x_xxx. The ;x’ represents the version number of the firmware.
- Then, ensure the serial port field, which is the red square right picture, shows your printer's name; for example, Original Prusa i3 MK3. And also make sure that it has a COM port allotted, for example, COM4.
- When you have confirmed step 5 above, click on the 'flash' button and let the procedure complete. You'll be able to see the progress on both the firmware flasher and the printer's display. And voila! That's all.
You may encounter some problems when updating. The next outline gives some common updating issues and how to tackle them.
Some Updating Issues
- If the serial port field does not show your printer's name, then try using another USB port on your computer, reinstall the driver or simply restart your computer.
- Uploading a different file "Wrong file has been selected for flashing".
Make sure to extract the firmware from the .zip folder and choose the .hex file for your printer's model.
- Another Cable and USB port
When you encounter this problem, try using another USB port of your computer. Afterward, hit the 'Rescan' button in the firmware flasher tool in PrusaSlicer. Also, ensure the cable is plugged all the way in on both sides, or maybe even try using another cable.
Before it is confirmed that the update process is completed, do not unplug the USB cable. Again, you can monitor the flashing progress on the Firmware Updater tool in PrusaSlicer.
- Squares on the LCD
If the LCD and menu were in perfect working condition before flashing but starts showing only squares after flashing, then you must have flashed the firmware for a different model onto your printer. Ensure you select the correct one for your printer's model.
- Timeout Error
The mini RAMBo or EINSY RAMBo board is not responding to the Firmware Updater tool. Make sure your printer is turned on, then ensure your fuses are in good working order.
- COM port/device
The printer occasionally appears in Device Manager, but not among COM devices. If the printer appears in the device manager but not as a COM device, try the following:
- Drivers should be reinstalled from the installation folder:
- C: Program Files Prusa3D Rambo dpinstx64.exe (64-bit systems) or
- C: Program Files Prusa3D Rambo dpinstx86.exe (32-bit systems)
- After that, restart your computer.
- Check to see if the printer is shown as a COM device in Device Manager. Use that COM port and manually enter it in the software's port area.
Whether you receive an error message stating that the Firmware Flasher is unable to communicate on COM3 or another port, check your port settings to see if another device is utilizing that port. Restart your computer after ejecting the device or changing its COM port to a different number.
If you have any problems, go to the Prusaprinters forum and look under "Firmware Update and Flashing Problems", and if the firmware fails to function properly after being installed, the printer can be factory reset to its original firmware.
Basic Checks
Before flashing the firmware, make sure you have the most recent DRIVERS & APPS package installed on your computer. Uninstalling all programs from Prusa, getting the Drivers, and reinstalling them fixes the problem in certain cases.
Even if the USB-connected printer is turned off, PrusaSlicer will detect it, but the printer must be turned on to upgrade the firmware.
Connecting both USB cords at the same time is not a good idea! Only one logic board can be attached at a time, and each firmware must be loaded independently.
Make sure your printer doesn't have any other serial connections active at the time of flashing. This includes Arduino IDE, Serial bridges, or other COM devices in operation.
How To Update Prusa Firmware with Octoprint
Octoprint is a web interface open-source 3D printer controller software that lets you monitor the activities of your printer and allows you to control the printer remotely
The recent Prusa 3D printer devices support Octoprint and firmware of these devices can be updated with Octoprint in a few simple steps;
- Make sure your printer is connected to your computer via USB cable
- Download the latest Prusa firmware update and save it in a path that is easily accessible preferably on the desktop. Extract the Hex file from the update.
- Install avrdude on your Raspberry pi controller for your printer.
- Open Octoprint software on your computer and navigate to plugin manager 🡪 go get more.
- A display box appears on the screen, type in “firmware updater” in the box and click install.
- Octoprint and navigate back to firmware updater, click on browse from the firmware updater window.
- Select the Prusa Hex file, click open, and select “flash from file”
It’ll take probably about five to ten minutes and then your printer will be updated. When it’s done, your printer will restart.
Latest Prusa Firmware Version
In June 2021, Prusa Research released version 3.10.0 firmware for their flagship line of 3D printers. The new Prusa firmware targets the MK3, MK3S, MK3S+, MK2.5, and MK2.5S platforms, and like always, it is shared as open-source software on GitHub. It is free to download and use for anyone.
Prusa Research put a lot of work into developing this latest version with a change in the display of time remaining for print. Another improvement fixes the slow response time for file discovery. Prusa Research has also completely recoded the XYZ calibration routine. They claim the process is now much faster and shows results in a precisely calibrated Original Prusa device.
One notable change has been a series of minor updates that are supposed to make the device easier to work with remote control systems like Octoprint.
Although the overall firmware update for the Prusa printer devices is good, its major setback is the fact that the tiny display panel only displays four lines of twenty characters and they have done a good job in squeezing data into those four lines. But that is a major drawback as it cannot display more complex data.
Conclusion
This article provides simple and easy steps to update your Prusa firmware, even from Octoprint. It must be noted though that an update might not be necessary unless a new update tackles a problem you've been having. Everything you need for a seamless Prusa Firmware update is provided above.
Leave a comment