

Tips and Tricks to Reduce Your Print Time Significantly
Have you been printing slowly when using 3D printing? Before going on, relax. You are not the only one in this category. You either have been going about it the wrong way, or you are a beginner. Any way that is, you must first understand that 3D printing is not a very hard manufacturing process. While it might look hard, you only need some tutoring, tips, and tricks to better understand the process. One of such tips and tricks that we will target here is directed to reducing your print time.
Reducing your print time comes in two different ways. You would have expected that reducing the print time will affect the quality. Yes, it has an effect. However, there is a way to do it without it affecting your quality. Therefore, we will treat it in two ways. Read on!!!
Reducing Print Time Without A Drop in Quality
Maintaining quality is an important aspect in 3D printing. Quality is synonymous to a better outlook. Therefore, it is better to reduce print time while keeping this in check. Below are few steps you can take to reduce print time without quality dropping.
Increase the Printing Speed in Slicer Settings
Increasing the printing speed will surely reduce the print time. To increase the printing speed using the slicer settings depends on the design you are working on. The bigger the design, the better suited it is for an increase in printing speed. This is because you can easily adjust the three major print speed settings. The three major settings are the perimeters, infill, and support material speed settings.
After adjusting the speed slicer settings, the next thing is to make sure you reduce the inertia and moment to the barest minimum. You can achieve this by tightening the screws, rods, and other parts to make it sturdier. Reducing the inertia and moment will be the one to maintain quality while increasing the printing speed.
Adjust the Acceleration and Jerk Settings

Acceleration value is how fast the print head reaches its top speed. Therefore, if you print at very low acceleration, you will have a longer operation time. Your 3D printer jerk value is how fast the print head will move from inertia before acceleration matters. It is more like how you jerk and react to a zap or shock. Looking at it, you should make sure your jerk value is not much. The jerk value must be smooth instead of rough.
Increasing the jerk value will surely increase your printing speed. However, it can lead to mechanical stress on your 3D printer. This is equal to having a low-quality product.
You can increase the print speed using this method while having the quality in check. You have to find an acceleration and jerk value optimal for the speed you want and the quality you want to maintain. You can do this by getting a high value and a low value, then working a middle value. This middle value is what we will use. If it also becomes too high, we go down until we can find something with a lower print time and quality.
Change the Infill Pattern

Depending on your slicing software, there are many infill patterns you can work with. Infill patterns are important here because they affect the speed and strength of your 3D prints.
An infill pattern cannot have everything. That means that unless rare cases, it can not have both speed and strength at the same time. For example, the line (rectilinear) infill pattern has speed but lacks strength. When used, it can reduce print time by about 25%.
While using this infill pattern will surely reduce print time, the quality is reduced in terms of strength. Therefore, you should be able to choose an infill pattern that is fast yet strong. Examples are the triangle, grid, and gyroid infill patterns.
However, with infill patterns that comes with low strength, there is a way to increase the strength. You can do this by increasing the extrusion width and adding walls to the design.
Reduce the Infill Density

When we say a material has 0% infill density, it simply means that the inside is hollow. When we have a 100% infill density, we have solid material. The relationship between infill density and print time is directly proportional. If you need to reduce the print speed, you have to reduce the infill density. This is because there are lesser movements for the 3D printer when you have a hollow design.
Reducing infill density is easier said than done since it depends heavily on the product. Unless the product's design allows for a reduction in infill density, it is not an ideal solution.
Adjust Wall Thickness
Decreasing the wall thickness will also reduce the print time. You can work with a wall line count of 3 and a diameter of 0.8mm for most 3D prints. If it does not work for you, you can play with the settings to get a number that gives you good speed and quality.
However, both wall thickness and infill density play to the strength factor. Therefore, you must be aware of such settings before going on with it. Normally, when you adjust the two, you must have it in a good ratio. This will help you retain the product's structural capabilities. You will have a failed print when you use a bad ratio (a low wall thickness and infill density). You can only use the two where strength is not of importance, e.g., in prototypes.
Using Dynamic Layer Height
Dynamic layer height is a great feature in which the traditional layer height of printing is adjusted. Unlike the traditional layer height, using the dynamic layer height will reduce your print time.
Adjusting the traditional layer height depends on the angle of the layer. It works by determining the area that needs a thinner or thicker design. For example, curved surfaces are printed in thin layers for a smooth effect. Using a Dynamic layer height does not affect quality.
Print Multiple Objects in A Go

This is a simple hack into reducing your print time. Utilizing all the space in your printing bed will help you finish early. While it might not be a hack totally directed towards reducing print time, it helps.
However, printing multiple objects is only possible with small designs that can fit into the print bed. Therefore, you can only do this with 3D printers that have large build volume.
Remove Support Material

This is a self-explanatory factor. The more materials the process exudes, the higher the print time. Therefore, if you want to achieve a better print speed, you should try to cut down on your use's support material.
While it might not be ideal for removing support material for all designs, there are many methods you can use to reduce the support material. For example, you can utilize the best model orientation and use custom support for holding it up. Another way is to split the model and print them on the same print. However, this can lead to an increase in operation time since you will glue them together after printing.
Reduce Print Time with A Drop in Quality
If you don't care about the quality of the material, there are two ways that you can reduce print time.
Increase Your Feed Rate
A simple way to reduce your print time is to increase the feed rate. One way of doing such is to use a larger nozzle. A larger nozzle will provide more space for material extrusion, which will reduce the print time. However, an increase in extrusion rate will lead to a reduction in quality. You can see the reduction in quality in the formation of visible lines and rough surfaces of the 3D printed material.
Increase the Layer Height
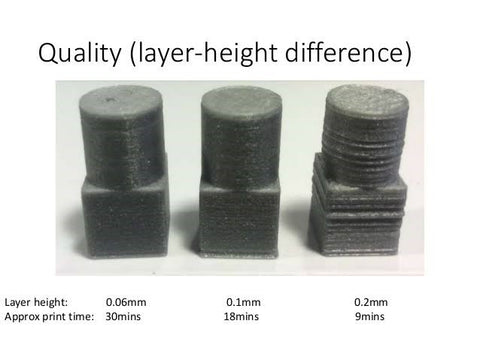
The layer height is the most crucial factor in terms of the quality of 3D printed products. When correctly set and used, you will have a product that has a better value than when not used. The layer height must be lower for you to enjoy this effect. When the layer height is low, there is an increase in the print time. Therefore, to reduce the print time , you need to increase the layer height.
You don't need to worry about losing quality when you increase the layer height if you work with prototypes that needs quick development.
What Other Thing Can I Do?
Print time is a significant factor in efficient 3D printing. However, while it is important to reduce it, there are other things you can consider that is not related to doing a setting. One important thing is to improve printing speed by getting a better 3D printer.
Yes, the 3D printer plays a huge role in your operation speed. Some 3D printers work like the flash. Some work anything than the flash. Therefore, the better thing you should do is get a very speedy 3D printer. With that done, you probably won't need the tips and tricks explained above.
Conclusion
A long print time is very frustrating thing. Therefore, there are many questions on how to decrease the print time. Doing this comes in two categories: decreasing without loss of quality and with loss of quality. This article demystified the process, thereby offering you a significant way to reduce the print time as much as you like. With practice, you will get to know the best settings out of the listed ones which will guarantee you saving a few hours while working.
Leave a comment