3d Printing Profile Settings for Props- How to Set Up Your Slicer for 3d Printing Cosplay Props
Lets face it, if you found me you’re likely to want to print props from movies, video games, TV shows, etc. I mean that’s why we got a 3d printer right? So we can print the coolest toys!? But to print these bad boys we need to have the perfect print settings. So lets get into it. Here are the best 3d printer settings for 3d printing props, armor, and cosplay.
Now these settings can be translated to any slicing software, but for this article itself it’s for Simplify 3d. These settings are optimal for the combination of speed and quality. This way you can crank out your prints with the best quality at the fastest speeds
One thing to note, these settings are for PLA. PETG, TPU, and ABS settings are different than PLA. There are cooling, ambient temp, and other factors that are needed for other materials. Also, these profile settings are for my CR10S4. I personally believe that each machine has it’s own personality and some need more love and tweaking than others. My machines come with a quality check from the distributor so there’s not much I need to do to them. You can get them from Tiny Machines. To order from them, click here.
Nozzle
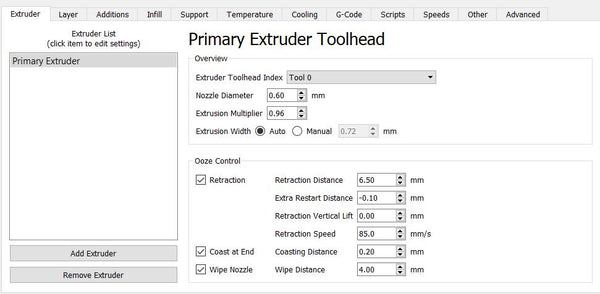
I like to use a .6mm diameter nozzle instead of the stock .4mm. the reason for this is I can print the same thickness with 2 walls instead of 3. This cuts time of print by 33%(2 walls instead of 3). But even though I’m using a bigger nozzle, its not that drastic of difference because it’s still small enough to get the tiny details like crevices, etches, engravings, and small screws on your print. Going too big on a nozzle like a 1mm, can negatively affect the details that the model has. Unless you’re printing something so massive, then a .6mm nozzle is best.
The .6mm nozzle also lets you have an extrusion with of 120% which brings it to .72mm. But since you’re printing with 2 walls, it comes to 1.44mm. this is more than sufficient for rigidity and strength. But what if you just took a 1mm nozzle and did a 1.2mm extrusion width? Well because the nozzle is too large, you also might not be able to really show the small fine details of STL you’re trying to print.

Speeds
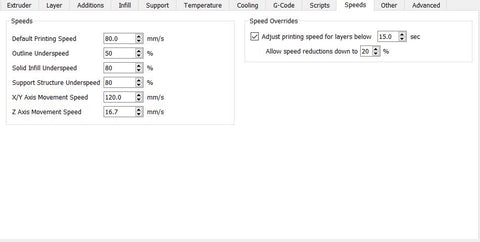
My speeds are at 80mm/s. The most common speed is 60mm/s with a .4mm diameter nozzle. These speeds are largely dependent on several factors like jerk, acceleration, temperature. All these then affect how fast you can print.
I’ve found that to get the best out of my props, 80mm/s is the sweet spot.

Temperature
The temperature I use is 220 degrees. This allows me to print at a faster speed while maintaining print quality. For some brands you can print at 210 or even 200. Some brands can even go as low as 190 or even 180. It all depends. I like it hot.
Level of temperature can also determine the finish of the print. Hotter temps can give a glossier effect while temperatures on the lower end can give a matte finish.
For the print bed I print at 60 degrees. This gets me the maximum stick to the bed of the print. But if you really want your prints to stay on the bed, I suggest using masking tape. If you’re going to use masking tape, you don’t need the heated bed. Warning though, sometimes masking tape makes your prints to stick a little too well.

Bed Temperature
For bed temperature, 45-60 degrees is enough. The problem with this is that sometimes, even with a heated bed, the print can easily pop off the build surface. What I do is I use regular brown masking tape and I line the bed with it. Masking tape will provide a nice surface for the filament to stick to. The masking tape surface also provides excellent stability for prints. I personally think it makes the prints stick to the bed better than a heated bed. For the tape method, you just have to line it up sticky side down. The best part? You don’t need to heat up the bed when you line it up with tape, saving you on energy bills.
Retraction
Retraction affects your stringing, blobs, zits, and other imperfections on the surface of your print. My retraction settings are shown in the picture here. This gets rid of my stringing and keeps my prints clean with no blobs or zits.
Cooling
Here are my fan cooling settings.

Layer
99% of the time, I print at .2mm layer height. Unless I don’t really care too much for the detail, which is when I print SUPER large stuff like the Buster Sword or Thanos Sword. At .3mm layer height, these swords wont lose too much detail on them because they’re so large.

Final Thoughts
Again, the best place to get your machines is from Tiny Machines. If you want a machine that's great out of the box with MINIMAL problems if any, then this is THE place to go. To order from them, click here.
And that’s it! Those are my settings for the most part. Hope I was able to help you with your profile settings for your 3d printed props. If you ever need anything feel free to email us at any time!


Leave a comment