

How to 3d Print Your Own Star Wars Death Trooper Helmet
If you’re a big Star Wars fan, you should know that the Death Troopers made their first appearance in the Rogue One instalment of the series. They are an elite variant of the Galactic Empire’s stormtroopers designed for stealth, espionage and lethality. They wore black suits of body armor and specialized helmets with vocal scramblers, micro-motion sensors, and heads-up displays with data on enemy and friendly positions on the battlefield.
Shortly after the release of Rogue One, there was a sudden craze for the Death Trooper armor. In this tutorial, I am going to show you how to 3D print your own Death Trooper helmet to perfection.
You don’t have to be a 3D printing expert to be able to do this. You just need to pay attention to details and of course, have all the tools required.
The Death Trooper Helmet has been split into two pieces for easier printing. Therefore, two .stl files to be downloaded which are the the Neuro-Saav Macromotion (NSM) Monitor piece and the main helmet piece.
You can get the .STL files here.
The 3D printer used in this tutorial is the Creality CR10 S4. The filament used is the Zyltech Hot Rod Red Silk. Save 15% off your filament with Zyltech!- Use the code “nikkoindustries” at check out!
The slicer (3D printing software) used in this tutorial is Simplify3D. You can definitely use any slicer and 3D printer available to you.
This tutorial has also been split into three separate parts which are;
PART 1: Printing the Neuro-Saav Macromotion (NSM) Monitor
PART 2: Printing the Helmet
PART 3: Post-Processing of the print
Now, let’s begin
PART 1: Printing the Neuro-Saav Macromotion (NSM) Monitor
Step One: Setting up your slicer
Import the downloaded .stl file for the NSM monitor into your slicer
Step Two: Orientation of the NSM Monitor
The NSM monitor should be positioned in a 90-degree angle as seen in the image below. This position will minimize the amount of supports needed while printing.

Step Three: Addition of Support
You only want to add supports to the base of the NSM monitor as shown in the images below. To do this, click on the “Support Generation” tool as indicated by the arrow below.


Go on and input the values as seen above.
Now, all you have to do is click on “Generate Automatic Supports”, simplify3D will generate supports to every part of the NSM monitor that it detects needs supports. We don’t need some of the supports that will be generated automatically so we will remove them.
To remove some of the unwanted supports, click on “Remove existing supports”. This option will allow you manually remove supports from wherever on the NSM monitor by just clicking on them. Go ahead and remove supports until you achieve what looks like the images below. The screenshots below show all angles of the monitor.
In case simplify3D doesn’t generate all supports seen in the images automatically, you can also use the “Add new support structures” option to add them manually.


Step Four: NSM Monitor Print Process Settings
You can access the print process settings by clicking on “Edit Process Setting” while your process has been highlighted or double-click the process you want to edit in the lower left corner.

A window like the one below will pop up. This is where you will input your print process settings.

On the General Settings, make sure “Include Raft” and “Generate Support” are both checked.
An infill percentage of 20% is preferred for this print.

Now let’s go onto the various tab settings:
Under the “Extruder” tab

Under the “Layer” tab

Under the “Temperature” tab
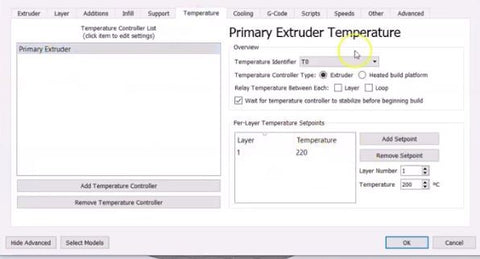
Click “OK” when you’re done inputting all necessary settings as shown above.
Go ahead to print your NSM monitor by clicking on “Prepare to Print”.

PART 2: Printing the Helmet
Step Five: Orientation of the Death Trooper Helmet
You want to orient the helmet as shown in the image below. What we hope to achieve by tilting it this way is so that you don’t need supports under the visor while printing.

To achieve this, you can access the orientation settings by clicking on the tool pointed at by the arrow below and input the values as shown in the window that pops up.


Step Six: Addition of Supports
You only have to add supports to the base outline and some other parts of the helmet as shown in the images below. You don’t need supports in the hollowed center of the helmet. Step three from part one shows how to access the “Support Generation” tool.


Now, by clicking on “Generate Automatic Supports” in the Support Generation tool, Simplify3D will generate supports to every part of the helmet that it detects needs supports including the hollowed center of the helmet. We don’t want that as we only need supports on the base outline, and some other parts of the helmet as shown in the images above.
To achieve this, click on “Add new support structures”. This option will allow you manually place supports wherever you want them on the helmet. Go ahead and place your supports as shown in the images above.
Be sure to inspect your model and make sure supports are added as shown in the images above before you start printing. Please note that the instruction for this step is quite different from the one for the NSM monitor support generation ().
Be careful!
Quick Tip: If you noticed, I mentioned that you don’t need supports for some parts of the NSM monitor and helmet (the hollowed center especially). You might be wondering how you too can know whether or not you need supports for a part of your print, so you can save time and filament material while printing.
Answer: Because 3D printers print layer by layer, you mostly only need supports when the next layer to be printed doesn’t have any layer under it and that layer is not the first layer. Definitely, the 3D printer cannot print in thin air. Another case where supports are needed is when the angle between the layers (overhang angle) exceeds 45 degrees.
If you study the geometry of your print and take those points into consideration, you should be able to tell when you need supports or not. This decision will help you save printing time and filament material.
Step Seven: Helmet Print Process setting
The print process settings used for the NSM monitor are the same settings to be used for the helmet.
Follow the instructions from step four of part 1 when you get to this stage. Repeat for the helmet.
Go ahead to print your helmet as soon as you’re done inputting all necessary settings by clicking on “Prepare to Print”.
PART 3: POST-PROCESSING OF THE HELMET AND NSM MONITOR
At this stage, you should have your helmet and NSM monitor well printed if you followed all the steps in part 1 and 2 carefully. Well done if you have made it to this stage. All that is left now is to finish your prints and make them shine.
All materials needed for post processing:
Gorilla Epoxy Glue – Amazon Link
Wood Filler – Amazon Link
Filler Primer – Amazon Link
Primer – Amazon Link
Glossy Black Spray Paint – Amazon Link
Visor material – Amazon Link
Step Eight: Gluing both pieces
After printing, you want to use to glue the NSM monitor to your helmet. I recommend the gorilla epoxy glue. You can get it here.
Step Nine: Application of wood filler, filler primer and first sanding
After your helmet is done printing, you might notice some dents, holes, and, layer lines This step will help you take care of all that so you can have a smooth 3D print.
For holes and dents on some parts of your helmet, you want to apply some wood filler to cover up these contours. You can get the wood filler I used here. Make sure to apply the wood filler to all surfaces that are not levelled. When you are done, leave it for a few minutes to dry up.
When the wood filler is dried up, you want to smoothen it as much as you can so that the surface rhymes with the rest of your helmet. To smoothen out the wood filler, you need to sand it using a sandpaper. With the help of a sanding block, start out with a 120-grit sandpaper and then use a 400-grit sandpaper to smoothen it again. This will give you a very levelled surface.
After sanding, you want to spray a filler primer on the smoothened wood filler. You can get the filler primer I used here.
When you’re done filling and sanding, you want to cover up and smoothen out the layer lines formed while printing by painting with Rapid Fill. You can get this at any utility store close to you. Leave your helmet out to dry after painting.
Step Ten: Final sanding, application of primer and spray painting
When the Rapid Fill has dried up, you want to sand the whole helmet again. Start with the 120-grit sandpaper and then sand again with the 400-grit sandpaper. After sanding the whole helmet with both sandpapers, you need to prime before you spray paint it. Please note that the primer used here is not a filler primer. You can get the primer I recommend here.
After spraying with your primer, your helmet should be looking like this.

You can now go ahead to spray paint your helmet with your glossy black paint. You can get that here.
Step Eleven: Installation of Visor
The material we will use for the visor is a grinding shield replacement. You can get that here. All you have to do is to cut the plastic along the crease (the red line) as shown in the image below.

After cutting, you just have to glue it on the inside of your helmet using a hot glue or the gorilla epoxy glue used earlier.
And there you have it!! Your own Star War’s Death Trooper Helmet.https://www.youtube.com/embed/v5cQU63j16Q
Leave a comment